openstack搭建之认证服务keystone安装(三)
该页面所有操作均在controller节点配置
一、安装并配置keystone服务
创建keystone数据库并配置keystone的访问权限
mysql -uroot -p000000
create database keystone;
grant all privileges on keystone.* to 'keystone'@'%' identified by '000000';
grant all privileges on keystone.* to 'keystone'@'localhost' identified by '000000';
exit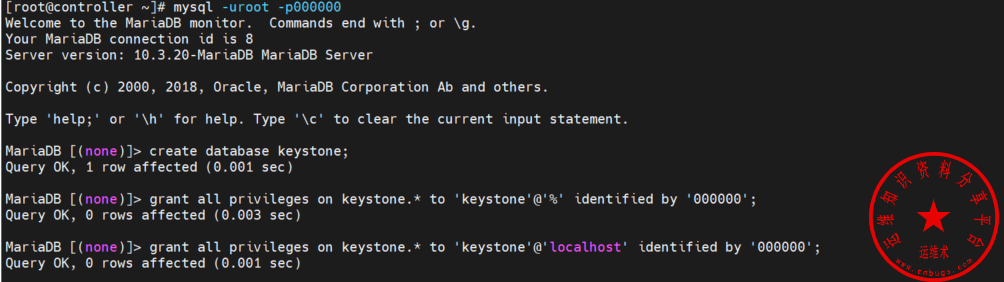
安装keystone和apache相关软件包
yum install -y python2-qpid-proton
yum install -y openstack-keystone
yum install -y httpd mod_wsgi
修改keystone配置文件
mv /etc/keystone/keystone.conf /etc/keystone/keystone.conf_bak
cat>/etc/keystone/keystone.conf<<EOF
[DEFAULT]
[application_credential]
[assignment]
[auth]
[cache]
[catalog]
[cors]
[credential]
[database]
connection = mysql+pymysql://keystone:000000@controller/keystone
[domain_config]
[endpoint_filter]
[endpoint_policy]
[eventlet_server]
[federation]
[fernet_receipts]
[fernet_tokens]
[healthcheck]
[identity]
[identity_mapping]
[jwt_tokens]
[ldap]
[memcache]
[oauth1]
[oslo_messaging_amqp]
[oslo_messaging_kafka]
[oslo_messaging_notifications]
[oslo_messaging_rabbit]
[oslo_middleware]
[oslo_policy]
[policy]
[profiler]
[receipt]
[resource]
[revoke]
[role]
[saml]
[security_compliance]
[shadow_users]
[token]
provider = fernet
[tokenless_auth]
[totp]
[trust]
[unified_limit]
[wsgi]
EOF
初始化数据库
su -s /bin/sh -c "keystone-manage db_sync" keystone初始化Fernet Keys
keystone-manage fernet_setup --keystone-user keystone --keystone-group keystone
keystone-manage credential_setup --keystone-user keystone --keystone-group keystone
引导开启身份服务
keystone-manage bootstrap --bootstrap-password 000000\
 --bootstrap-admin-url http://controller:5000/v3/\
 --bootstrap-internal-url http://controller:5000/v3/\
 --bootstrap-public-url http://controller:5000/v3/\
 --bootstrap-region-id RegionOne
二、配置Apache HTTP SERVER
编辑配置文件
vim /etc/httpd/conf/httpd.conf修改或添加,大约在96行的位置
ServerName controller创建/usr/share/keystone/wsgi-keystone.conf软连接
ln -s /usr/share/keystone/wsgi-keystone.conf /etc/httpd/conf.d/启动apache服务并设置开机启动
systemctl enable httpd
systemctl start httpd
查看服务状态
systemctl status httpd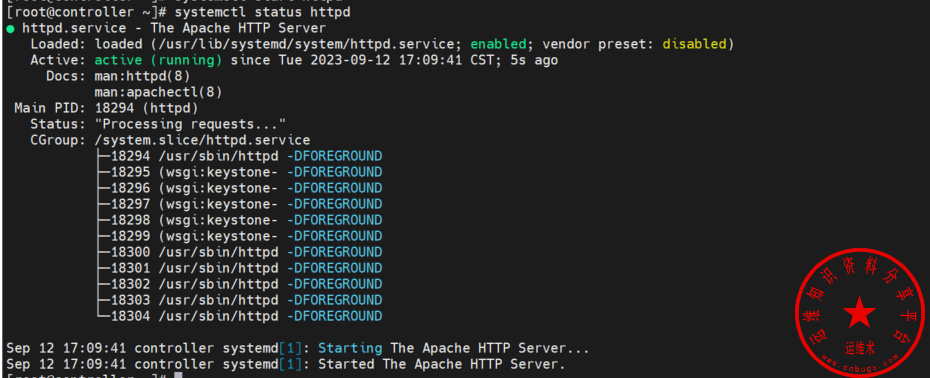
三、测试keystone服务
配置环境变量
cat>/root/admin-openrc<<EOF
export OS_USERNAME=admin
#密码是你安装openstack时的设置的统一密码
export OS_PASSWORD=000000
export OS_PROJECT_NAME=admin
export OS_USER_DOMAIN_NAME=Default
export OS_PROJECT_DOMAIN_NAME=Default
#你刚才查到的keystone的认证url
export OS_AUTH_URL=http://controller:5000/v3
export OS_IDENTITY_API_VERSION=3
export OS_IMAGE_API_VERSION=2
EOF
获取Token
source admin-openrc
openstack token issue
创建新域
openstack domain create --description "An Example Domain" example创建一个server项目
openstack project create --domain default --description "Service Project" service创建普通用户的项目和用户
openstack project create --domain default --description "Demo Project" myproject
openstack user create --domain default --password-prompt myuser
创建myrole角色
openstack role create myrole创建myrole项目、角色、用户关联
openstack role add --project myproject --user myuser myrolekeystone验证
取消设置临时变量OS_AUTH_URL和环境变量OS_PASSWORD
unset OS_AUTH_URL OS_PASSWORD以admin用户身份请求身份验证令牌
openstack --os-auth-url http://controller:5000/v3 --os-project-domain-name Default --os-user-domain-name Default --os-project-name admin --os-username admin token issue
至此openstack搭建之认证服务keystone安装完成!!!
声明:本站所有文章,如无特殊说明或标注,均为本站原创发布。任何个人或组织,在未征得本站同意时,禁止复制、盗用、采集、发布本站内容到任何网站、书籍等各类媒体平台。如若本站内容侵犯了原著者的合法权益,可联系我们进行处理。


